Difference between revisions of "Velcro Based Modular Panel"
Weisshaupt (talk | contribs) |
Weisshaupt (talk | contribs) |
||
| Line 39: | Line 39: | ||
== See Also == | == See Also == | ||
| − | [[ | + | [[Modular Control Panels]] |
Latest revision as of 22:13, 29 January 2008
This Panel was developed for The Ghost in the Machine and attempts to address some of the shortcomings of Modular panels. The design uses a top slot and Velcro to keep panels firmly in place. This allows a much greater tolerances to be used in fabrication, as well as panels of any desired size. This particular design also uses CCFL lights to side light etched plexi glass mounted on the indivdual panels. This give a novel new method to integrating Art into the design. Rather than trying to hide the panel seams, the edges of the plexi are beveled to catch the light, so that the Seams look they they are meant to be there.
Mounting
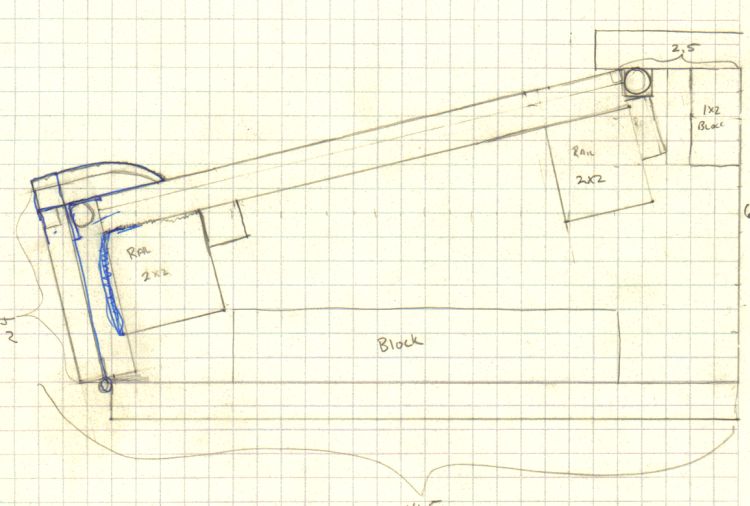
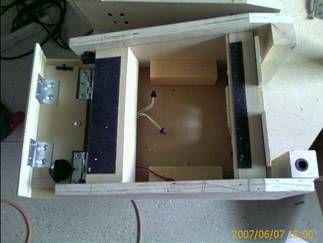
The design uses two 2x2 rails (of that nice Poplar hobby variety that Home Depot Sells) fastened between 2 pieces of ¾ plywood. A board fastened to the top creates a slot. This prevents the top of the panel from being pulled up, while also ensureing an insertion at a right angle to the rest of the Control Panel. The Top rail has a ¾ inch width strip of Velcro hooks, although a 1/2 inch strip would proably be sufficent. Likewise the bottom rail has 2 in strips of Velcro hooks on the top and side. The Top strip prevents movment side to side, and the side strip acts like a velcro shoelace, changing the angle of action and firmly holding the panel to the bottom rail. If desired a black can be added to the panel to ensure Right angle alignment with the bottom rail, but experimentation has discovered this is not required.
The Back rail is used to affix a panel which holds RJ45 Quickport inserts and clips which hold the CCFL lights in the right position to shine on the Plexi Glass at the top of the panel. The Bottom part of the Control Panel is covered with a door and flap which form a second slot at the bottom of the panel. Attached to this door are a second set of CCFL lights to illuminate the bottom half of the panel. The door and flap also cover the velcro strips which hold the panel in place. The door covers the panels, but does nothing to hold them in place: the velcro "shoelace" is more than enough to prevent any movement of the panel during game play.
Panel Construction
The Panels are made of 2 layers: ½ inch MDF, covered with Black Vinyl from Parts Express, and ¼ inch plexiglass affixed to the base with countersunk screws. When building each panel a table saw was used to cut the MDF and the Plastic to the size required. The plexi was then marked and drilled with a drill press to countersink the Attachment locations. I the Plexi was then attached to to the MDF with screws and returned to the Dril Press to drill the holes required for the controls. The screws that held the plexi on the MDF where then removed, and the plexi eadges were sanded and polished with Novus #3 and #2. A bevel was added to the egdes with the sander before polishing, to highlight the seams of each panel. This also hides any small chips which may have occured while cutting the plexi.
The Art was etched into the back side of the plexi using a dremel etching tool (NOT a dremel tool with etching attachment) The art was prepared and reversed using a computer and then printed out and affixed to the front of the panel using blue painting tape. When etching the pieces of plexi, work on a low table and bend directly over the work. Placing lit CCFLs on the sides of the plexi aides greatly to highlight the cuts. Avoid brushing the work to remove the excess plastic- the samll chips will scratch the surface. To avoid this, stand the piece on the side and bang it, or blow the scrap material off of the piece. Once complete the piece can be washed under the sink to get any other scrap off, and then blotted it dry. Blue tape can then be pressed on the surface over the etched surfaces to further remove any remaining particles.
A more expensive alternative that yielvery professional results is Laser etching. Companies like Lazerdesigns can take artwork and etch it directly into the plexi with a laser. The Laser can also be used to create polished cuts for both the panels and the controls.
The MDF was then covered with Vinyl, using a hobby knife to trim the excess. Using Blue tape to remove any dust from the MDF panel and the plexi, the clean surfaces are then re-affixed with the screws.
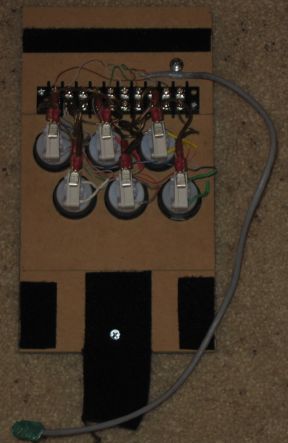
Two strips of Loop side of the Velcro were then attached in the appropriate spots to meet the top and bottom rails. (using the loop side has the additional benefit of not sticking to the carpet when the panel is placed on one.) The terminal Strips are then attached with screws to allow the electrical connection to be made between the controls and the Cat-5 Cable. The Velcro "shoelace" flap was made by taking a 5 inch piece of 2 inch wide loops and placing ½ of it on the MDF. The Other half of the strip was covered with 2 pieces of 1 inch wide Nylon Strapping purchased at Hobby Lobby. The strap is then secured with a screw to make sure the adhesive is not the only force holding the velcro to the panel as it is pulled from the rail.
Wiring
Color Coded RJ-45 from CyberGuys onto one end were used to match up to the inserts on the panel. This helps to ensure the right controls will be plugged in (even small children get the concept) A plastic wire clip and a screw are used to provide strain relief as the cable leaves the panel.
The Wiring table below allows +5v power to be provided to each panel for use with lighted controls. Lighted controls provide a positive feedback to the user that the control is at least plugged in someplace on the panel. Each of the panles detailed inthe diagram below is electrically consistent; a panel plugged in the wrong place will not cause damage.


